Creating an outdoor kitchen can significantly enhance your outdoor living experience. With the right design ideas and execution, you can tra...

Creating an outdoor kitchen can significantly enhance your outdoor living experience. With the right design ideas and execution, you can transform your backyard into a functional and stylish cooking and entertaining space.

Ready to add a touch of AI magic to your outdoor space? Elevate your backyard with HomeDesignsAI, your personal AI decor assistant. Explore simple outdoor kitchen ideas that blend functionality and style seamlessly. Let HomeDesignsAI guide you through a world of design possibilities. Click here to unlock the power of AI in transforming your backyard into a stylish and functional outdoor kitchen oasis!

Popular Yet Simple Outdoor Kitchen Ideas

With endless inspiration for simple kitchen ideas, you might find yourself searching through many options with no clear choice. However, we have compiled a few of the most popular and our favorite ones here:

Portable Grill Station

A portable cooking kitchen with a high-quality grill and a small prep station can be a simple outdoor kitchen idea that anyone can implement, given enough backyard space. You can use a rolling cart or a movable table to set up the grill, making it easy to relocate and store when not in use. Add some hooks for utensils and shelves for condiments to keep everything organized.

A portable grill station made of wood and has a built-in sink and grill.
Photo Credit: The Owner Builder Network

DIY Brick Oven

A simple brick oven for outdoor pizza nights or baking can be a fantastic addition to any outdoor space, especially for homes with ample room in the backyard. Use reclaimed bricks or a DIY kit to construct the oven, and place a sturdy table nearby for food preparation. This setup allows you to enjoy homemade pizzas and other baked dishes in your outdoor space.

Brick oven with log storage underneath.
Photo Credit: Family Handyman

Picnic Table Kitchen

Convert a sturdy picnic table into an outdoor kitchen by adding a built-in grill or portable stove at one end or, even better, in the middle. Use the table for both dining and food preparation, and consider installing a sunshade or umbrella to provide some shade. This simple setup is great for casual gatherings and family meals.

Family sitting on a picnic table with built-in grill in the middle.
Photo Credit: I Like To Make Stuff

Wooden Pallet Barbecue Station

Repurpose wooden pallets to create a budget-friendly outdoor kitchen. Use the pallets to build a simple structure for holding a grill and provide shelves for storage. You can customize the design based on your available space and needs. Stain or paint the pallets to enhance the aesthetic appeal.

A prep station made of pallets, with a BBQ on the side.
Photo Credit: Warren Nash

Garden Sink and Prep Area

Install a basic sink with running water in your outdoor space for easy cleanup, but make sure to consult the help of a plumber if you are a novice DIYer. Create a prep area with a durable countertop and storage shelves for utensils and ingredients. This setup allows you to handle food preparation and cleaning conveniently while enjoying the fresh air.

A wooden outdoor sink and prep station.
Photo Credit: Ana White

Other articles you might enjoy:

A simple outdoor kitchen can greatly enhance your outdoor living space and provide a versatile and enjoyable cooking and entertaining area. With the right design and tools, you can transform your backyard into a welcoming and inviting outdoor oasis for cooking, dining, and entertaining. Submit your backyard kitchen idea and we would love to showcase it on Decoist!

Ready to bring new life to your home? Subscribe to our newsletter for exclusive interior design tips, trends, and ideas that will transform your space. Click here to subscribe!

You're reading Simple Outdoor Kitchen Ideas to Enhance Your Backyard, originally posted on Decoist. If you enjoyed this post, be sure to follow Decoist on Twitter, Facebook and Pinterest.


from decoist https://ift.tt/HhyGFWZ

Creating your own homemade window cleaner is not only cost-effective but also environmentally friendly. With a few simple ingredients, you c...

Creating your own homemade window cleaner is not only cost-effective but also environmentally friendly. With a few simple ingredients, you can create a cleaning solution that leaves your windows sparkling and streak-free. In this comprehensive guide, we will explore the benefits of homemade window cleaner, provide step-by-step instructions for making your own, and offer tips for achieving professional-quality results.

Elevate your home with a touch of brilliance! Pair the sparkle of crystal-clear windows with the future of AI home decor. Unleash the magic of spotless windows and explore the AI-driven design possibilities that HomeDesignsAI has to offer. Ready to harmonize cleanliness and creativity in your living space? Click here now to transform your home with the perfect blend of clarity and AI-inspired decor.

The Benefits of Making Your Own Homemade Window Cleaner

Making your own window cleaner offers several advantages. Firstly, it allows you to control the ingredients, ensuring that no harsh chemicals are used, which is better for both your health and the environment. Also, a homemade window cleaner can be more cost-effective than store-bought alternatives, as the ingredients are often readily available and inexpensive. Furthermore, by using natural ingredients, you can reduce the risk of chemical residue on your windows, promoting a healthier indoor environment for your family and pets.

Essential Ingredients for Making Your Window Cleaner

Assortment of ingredients for making a homemade window cleaner.
Photo Credit: Canva Pro

To create an effective homemade window cleaner, you will need a few key ingredients. These typically include white vinegar, rubbing alcohol, and water. White vinegar is a natural disinfectant and helps to cut through grease and grime while rubbing alcohol aids in drying the windows quickly, preventing streaks. However, water is used as a dilution agent to create the cleaning solution. Other optional ingredients may include essential oils for a pleasant fragrance or lemon juice for additional cleaning power.

Step-by-Step Guide to Making Homemade Window Cleaner

Creating your own homemade window cleaner is a straightforward process. To begin, mix equal parts white vinegar and water in a spray bottle. If desired, add a small amount of rubbing alcohol to the mixture. Shake the bottle well to ensure the ingredients are thoroughly combined. For a refreshing scent, consider adding a few drops of essential oil. Once the solution is ready, it can be used on windows, mirrors, and other glass surfaces.

Tips for Achieving Professional-Quality Results

Closeup of person's hand wearing pink gloves using a green microfiber to clean window.
Photo Credit: Canva Pro

To achieve professional-quality results with your homemade window cleaner, it’s important to follow a few key tips. Firstly, avoid cleaning windows in direct sunlight, as this can cause the solution to dry too quickly and lead to streaks. Instead, choose a cloudy day or tackle the task in the early morning or late afternoon. For even better results, consider using a microfiber cloth or squeegee to wipe the windows, as these tools are effective at removing dirt and preventing streaks. Finally, be sure to wipe in a consistent direction, such as horizontally on one side of the window and vertically on the other, to easily identify and eliminate any streaks.

Window Cleaner Recipes for Different Needs

Depending on your specific cleaning needs, you may want to customize your homemade window cleaner recipe. For example, if you are dealing with particularly stubborn grime or hard water stains, you can add a small amount of lemon juice to your cleaning solution. Lemon juice contains natural acids that can help to dissolve mineral deposits and leave your windows sparkling. Alternatively, if you prefer a fragrance-free cleaner, simply omit the essential oils from the recipe.

Using Your Window Cleaner for Interior and Exterior Windows

A window being cleaned with squeegee with a blue sky outside.
Photo Credit: Canva Pro

Homemade window cleaner is suitable for use on both interior and exterior windows. When cleaning interior windows, simply spray the solution onto the glass surface and wipe it away with a microfiber cloth. For exterior windows, consider using a hose attachment to apply the cleaning solution, followed by a squeegee to remove excess liquid. By using your homemade window cleaner for both interior and exterior windows, you can maintain a consistent level of cleanliness throughout your home.

Storing and Shelf Life of Homemade Window Cleaners

Once you have prepared your homemade window cleaner, you may wonder about its shelf life and the best way to store it. Typically, homemade window cleaner can be stored in a cool, dark place, such as a cabinet or pantry, for several months. It’s important to label the spray bottle with the date of preparation to ensure you use it within a reasonable timeframe. However, if you notice any changes in color or odor, it may be time to discard the solution and prepare a fresh batch.

Safety Considerations For Window Cleaner Use

Assortment of ingredients to make homemade cleaner.
Photo Credit: Canva Pro

While making your own window cleaner is generally safe to do, it’s important to take certain precautions to ensure your safety and the safety of others. When handling the ingredients, be mindful of any allergies or sensitivities that you or your family members may have. Another thing to note, avoid mixing your homemade window cleaner with other cleaning products, as this can result in harmful chemical reactions. Aside from that, you will want to keep the cleaning solution out of reach of children and pets to prevent accidental ingestion or contact with the eyes.

Related Articles:

Making your own homemade window cleaner is a practical and sustainable choice for maintaining clean and clear windows. By using natural ingredients and following the tips provided in this guide, you can achieve professional-quality results without the use of harsh chemicals. So, why not give it a try and see the difference for yourself?

Turn your house into the home of your dreams. Our newsletter provides you with design ideas and decor trends. Subscribe now to start your journey to a stunning home! Click here to subscribe now.

You're reading Sparkling Solutions: DIY Homemade Window Cleaner, originally posted on Decoist. If you enjoyed this post, be sure to follow Decoist on Twitter, Facebook and Pinterest.


from decoist https://ift.tt/pxC69A1

The holiday season is a time for celebration, family, and friends. And for many people, that means lots of wine. If you’re like most peopl...

The holiday season is a time for celebration, family, and friends. And for many people, that means lots of wine. If you’re like most people, you’ve probably got a few empty wine bottles lying around from all of the festivities. But before you toss them in the recycling bin, consider repurposing them into something beautiful and useful. Here are five wine bottle crafts to try:

Wine Bottle Tiki Torches

Turn your empty wine bottles into beautiful outdoor lighting with this simple craft. All you need is some tiki torch fuel, a wick, and a few other supplies that you can find at your local hardware store. These tiki torches are perfect for summer barbecues and outdoor gatherings.

wine bottle tiki torch by pool
Photo Credit: eHow

Wine Bottle Planters

If you love gardening, wine bottle planters are a great way to add some greenery to your home. Simply cut the wine bottle in half, add some soil, and plant your favorite herbs or small plants. These planters are perfect for small spaces and make great gifts for friends and family.

wine bottles cut in half to make planters
Photo Credit: Kreating Homes

Wine Bottle Vases

Wine bottles make beautiful vases for fresh flowers. Simply remove the label and add some water, and you’ve got a stunning centerpiece for your dining table or mantle. You can even paint the bottles to match your decor.

wine bottles turned into vases
Photo Credit: Dessy Group

Wine Bottle Chandelier

If you’re feeling ambitious, you can turn your empty wine bottles into a stunning chandelier. This craft requires a bit more skill and some electrical work, but the end result is worth it. You can customize the chandelier to fit your decor and style.

wine bottle chandelier with wood top
Photo Credit: The Owner Builder Network

Wine Bottle Candle Holders

Wine bottle candle holders are a simple and elegant way to add some ambiance to your home. Simply cut off the bottom of the wine bottle and place a tea light inside. You can even decorate the bottle with ribbon or paint for a more festive look.

wine bottles turned into candlesticks
Photo Credit: Wine and Sprinkles

Repurposing your wine bottles is not only a great way to reduce waste, but it’s also a fun and creative way to add some style to your home. Give these crafts a try and see what beautiful creations you can come up with. Happy crafting!

You're reading 5 Wine Bottle Crafts to Repurpose Your Holiday Bottles, originally posted on Decoist. If you enjoyed this post, be sure to follow Decoist on Twitter, Facebook and Pinterest.


from decoist https://ift.tt/RKC3k0V

Welcome to the ultimate guide to DIY home decor! We’ll look at creative and practical tips for transforming your living space into a persona...

Welcome to the ultimate guide to DIY home decor! We’ll look at creative and practical tips for transforming your living space into a personalized and stylish oasis. From easy and affordable projects to more advanced crafts, we’ll cover a wide range of ideas to inspire your inner decorator.

Whether you’re a seasoned DIY enthusiast or just starting out, there’s something here for everyone. Let’s get into it and discover the endless possibilities of DIY home decor.

Dive into the future of design with HomeDesignsAI. It’s not just a tool; it’s an experience, offering a kaleidoscope of features that redefine the way you envision your living spaces. From personalized room transformations to limitless design styles, HomeDesignsAI is the key to unlocking a world of creative possibilities. Ready to transform your home? Explore HomeDesignsAI’s unparalleled features by clicking here now!

Getting Started with DIY Home Decor

Woman adding to her DIY mood board.
Photo Credit: Canva Pro

Embarking on a DIY home decor journey can be both exciting and daunting. To get started, it’s essential to set a clear vision for your space and gather inspiration from various sources such as magazines, websites, and social media platforms. Consider creating a mood board to capture your design ideas and color schemes. Additionally, take inventory of your existing furniture and decor items to determine what can be repurposed or updated with a fresh new look.

Budget-Friendly DIY Home Decor Ideas

Woman working on a DIY project to upcycle her old kitchen.
Photo Credit: Canva Pro

DIY home decor doesn’t have to break the bank. There are plenty of affordable and creative ways to revamp your space without spending a fortune. From upcycling old furniture to creating custom wall art, the possibilities are endless. Consider incorporating budget-friendly materials such as thrifted items, repurposed wood, and affordable craft supplies to bring your ideas to life. With a little creativity and resourcefulness, you can achieve a stylish look on a shoestring budget.

Transforming Spaces with Paint and Color

Half painted room with ladder and paint roller in the middle.
Photo Credit: Canva Pro

One of the most impactful ways to refresh your home decor is through the use of paint and color. Whether you’re giving a room a fresh coat of paint or experimenting with accent walls, color has the power to transform a space. Consider exploring trendy color palettes and experimenting with different painting techniques such as ombre, stenciling, or color blocking. Additionally, don’t overlook the potential of repainting furniture to breathe new life into tired pieces.

Personalized DIY Wall Decor

A DIY home decor consisting of wood hung onto the wall with fabric attached to it.
Photo Credit: Canva Pro

The walls of your home are a blank canvas waiting to be adorned with personalized DIY wall decor. From gallery walls featuring family photos to handmade artwork and wall hangings, there are countless ways to infuse your personality and creativity into your living space. Consider incorporating elements such as macrame, woven tapestries, or hand-painted canvases to add texture and visual interest to your walls. Embrace the opportunity to showcase your unique style through custom wall decor.

DIY Home Decor for Small Spaces

DIY floating shelves in a corner of a small space.
Photo Credit: Canva Pro

Living in a small space doesn’t mean sacrificing style and functionality. With the right DIY home decor ideas, you can maximize every inch of your home while creating a visually appealing environment. Consider space-saving solutions such as floating shelves, multifunctional furniture, and clever storage hacks. Additionally, explore the use of mirrors and strategic lighting to create the illusion of a larger, more open space. Embrace the challenge of decorating small spaces with creativity and ingenuity.

Sustainable and Eco-Friendly DIY Decor

Reclaimed wood bench with clothing placed on it.
Photo Credit: Canva Pro

In today’s environmentally conscious world, sustainable and eco-friendly DIY decor has gained popularity. Consider incorporating repurposed materials, upcycled furniture, and natural elements into your home decor projects. From creating planters out of recycled containers to using reclaimed wood for furniture and decor, there are endless opportunities to reduce waste and minimize your environmental footprint while beautifying your space.

DIY Home Decor Crafts for Kids’ Rooms

DIY home decor in a kids room, featuring a painted wall with a woman sitting upfront.
Photo Credit: Canva Pro

Designing and decorating kids’ rooms can be a fun and creative endeavor. Consider involving your children in DIY home decor projects to personalize their space and foster their creativity. From whimsical wall murals to handmade decor items and custom storage solutions, there are numerous ways to make a child’s room both functional and enchanting. Encourage your kids to express their unique personalities through DIY crafts that reflect their interests and passions.

Seasonal and Holiday DIY Decor

Closeup of someone's hand cutting Christmas trees with pine cones nearby.
Photo Credit: Canva Pro

Bringing the spirit of the seasons and holidays into your home is a delightful way to celebrate and create a warm, inviting atmosphere. Embrace the joy of DIY home decor by crafting seasonal and holiday-themed decorations. From handmade wreaths and garlands to festive tablescapes and mantel displays, there are endless possibilities for infusing your home with seasonal charm. Consider incorporating natural elements, seasonal colors, and DIY crafts that capture the essence of each holiday.

Incorporating Home Decor Trends

Modern room with various DIY home decor and furniture.
Photo Credit: Canva Pro

Staying current with the latest home decor trends can inspire fresh ideas for your DIY projects. Whether it’s embracing natural textures, minimalist design, or bold patterns, there are numerous trends to explore and incorporate into your home. Consider experimenting with trending materials such as rattan, terrazzo, and sustainable textiles. Additionally, explore popular design styles such as bohemian, Scandinavian, or mid-century modern to infuse your space with contemporary flair.

Related Articles:

DIY home decor offers a world of creative possibilities for transforming your living space into a reflection of your unique style and personality. By embracing DIY projects, you have the opportunity to infuse your space with creativity, ingenuity, and a personal touch that store-bought decor simply can’t replicate. Whether you’re revamping a single room or embarking on a full home makeover, the journey of DIY home decor is both rewarding and empowering. So, roll up your sleeves, unleash your creativity, and let the magic of DIY home decor unfold in your living space.

Turn your house into the home of your dreams. Our newsletter provides you with design ideas and decor trends. Subscribe now to start your journey to a stunning home! Click here to subscribe now.

You're reading Stunning DIY Home Decor For Elevating Your Home, originally posted on Decoist. If you enjoyed this post, be sure to follow Decoist on Twitter, Facebook and Pinterest.


from decoist https://ift.tt/S9QtObE

As the new year approaches, many of us start to consider ways to refresh our homes and our lives. One of the best ways to do this is by de...

As the new year approaches, many of us start to consider ways to refresh our homes and our lives. One of the best ways to do this is by decluttering your living spaces. But where to begin? Here are three rooms you need to declutter in the new year:

The Kitchen

The kitchen is often the heart of the home, but it can also be a major source of clutter. Start by taking everything out of your cabinets and drawers. Go through each item and ask yourself if it’s something you really need or use. If not, set it aside to donate or sell.

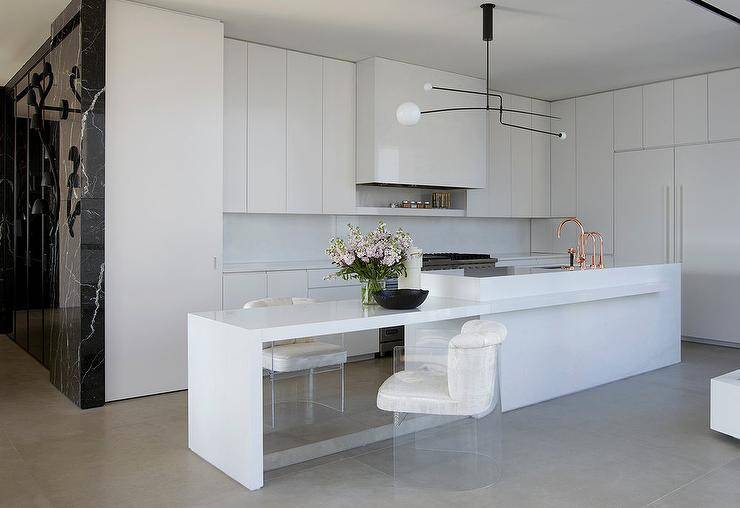
Spacious modern white kitchen features white velvet and acrylic stools at kitchen island dining table, an island sink with copper faucets and white flat front cabinets.
Photo Credit: Kara Mann

Next, tackle your pantry. Throw away expired items and donate any non-perishable food items that you know you won’t use. Finally, go through your refrigerator and freezer. Get rid of anything that’s expired or gone bad, and make a plan to use up any items that are close to their expiration date.

The Bedroom

Your bedroom should be a sanctuary, but a cluttered space can make it feel stressful and chaotic. Start by going through your closet. Take out anything that doesn’t fit, is stained or torn, or that you haven’t worn in the past year. Consider donating items that are still in good condition.

A large beach painting hangs in a welcoming shared cottage bedroom.
Photo Credit: Brooke Wagner Design

Next, tackle your dresser and nightstands. Get rid of any items that are broken, don’t belong in the bedroom, or that you haven’t used in a while. Finally, go through any other storage areas in your bedroom, such as under the bed or in the closet. Be ruthless in getting rid of anything that you don’t need or use.

The Home Office

With more and more people working from home, it’s important to have a functional and clutter-free home office. Start by going through your desk drawers. Get rid of any pens that don’t work, old paperwork, and anything else that’s not necessary. Next, tackle your bookshelves.

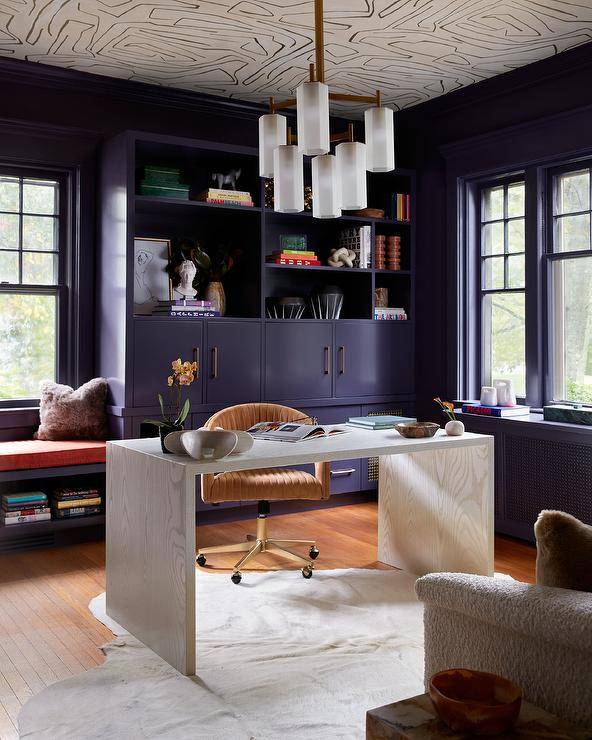
A gold and frosted glass chandelier hangs from a white and black wallpapered ceiling in a purple home office boasting a white oak waterfall desk matched with a white cowhide rug. The chair is placed in front of a purple built in cabinets topped with styled purple shelves. A purple window seat is topped with an orange cushion and a gray fur pillow. Purple walls are lined with purple crown moldings.
Photo Credit: Widell and Boschetti

Donate any books that you don’t need or won’t read again. Finally, go through any other storage areas in your home office, such as file cabinets or storage boxes. Be sure to shred any paperwork that contains sensitive information.

Related Articles:

Decluttering your living spaces is a great way to start the new year off on the right foot. By focusing on these three rooms, you’ll be able to create a more functional, organized, and peaceful home. So grab some boxes and bags, and get ready to declutter!

Ready to bring new life to your home? Subscribe to our newsletter for exclusive interior design tips, trends, and ideas that will transform your space. Click here to subscribe!

You're reading 3 Rooms You Need to Declutter in the New Year, originally posted on Decoist. If you enjoyed this post, be sure to follow Decoist on Twitter, Facebook and Pinterest.


from decoist https://ift.tt/R62UETK

In the world of kitchen decor, the significance of window coverings is often overlooked. Yet, the right selection of kitchen window curtains...

In the world of kitchen decor, the significance of window coverings is often overlooked. Yet, the right selection of kitchen window curtains can completely transform the atmosphere of your cooking area, adding elegance, practicality, and individuality. From maximizing natural light to ensuring privacy, the options are limitless. We will delve into a plethora of innovative ideas and useful advice to assist you in choosing and styling the ideal kitchen window coverings.

Tier Curtains

Tier curtains offer a tailored and versatile look, covering either the upper or lower part of the window. Opt for stripes or geometric patterns for a modern touch. Another idea is to mix and match different fabric textures within the tiers for added visual interest.

Valances

Kitchen with valances on the windows.
Created by Decoist

Valances add flair to the top of the window, providing a decorative touch. Choose a style that complements your kitchen’s aesthetic, such as scalloped or straight-edged designs. Experiment with layering by combining a valance with sheer curtains for a dynamic and textured look.

Roman Shades

Roman shades provide a sophisticated and tailored appearance, allowing for easy light control. Choose a fabric that complements your kitchen’s color scheme, such as subtle patterns like herringbone. Consider installing Roman shades with a blackout lining for enhanced privacy and light control.

Sheer Curtains

Kitchen with sheer curtains
Photo Credit: Amazon.com

Sheer curtains create a light and airy atmosphere, perfect for kitchens with ample natural light. Opt for delicate patterns like florals or subtle stripes. Introduce tie-backs or holdbacks to gather the sheer curtains and add a touch of elegance to the overall look.

Patterned Curtains

Patterned curtains can become a focal point, adding visual interest without overpowering the space. Choose patterns like geometric shapes or botanical prints that complement your kitchen decor. Combine patterned curtains with solid-colored ones to create a balanced and cohesive look.

Gingham or Checkered Curtains

Gingham or Checkered curtains on kitchen windows.
Created by Decoist

Gingham or checkered curtains evoke warmth and nostalgia in country-style kitchens. Opt for classic patterns in red, blue, or green. Add a creative twist by choosing checkered curtains with varying sizes of checks for a modern farmhouse feel.

Cafe Curtains

Cafe curtains bring a casual and charming feel to the kitchen, covering the lower portion for privacy while allowing natural light. Choose prints or classic gingham patterns to enhance the kitchen’s aesthetic. Additionally, consider adding a decorative trim or lace detailing for an extra touch of elegance.

Tie-Up Curtains

Grey tie-up curtains on kitchen windows.
Photo Credit: Amazon.com

Tie-up curtains provide a casual and relaxed vibe, allowing for adjustable coverage. Choose playful patterns or solid colors. Consider embellishing the tie-up portion with decorative bows or fabric flowers to enhance the curtain’s overall appeal.

Woven or Bamboo Shades

Natural woven or bamboo shades add texture to the kitchen, balancing privacy and a connection to the outdoors. Choose shades that complement your kitchen’s color palette. Consider adding a fabric liner to the shades for extra privacy and light filtering.

Related Articles:

The selection and styling of kitchen window curtains play a pivotal role in shaping the overall look and feel of your culinary space. By understanding the importance of functionality, fabric choices, and design elements, you can enhance your kitchen decor with captivating window treatments that reflect your personal style and improve the functionality of the space. Whether you opt for sheer coverings to embrace natural light or incorporate vibrant patterns to add a pop of color, the possibilities are endless when it comes to creating a captivating and practical kitchen ambiance with the perfect window coverings.

Turn your house into the home of your dreams. Our newsletter provides you with design ideas and decor trends. Subscribe now to start your journey to a stunning home! Click here to subscribe now.

You're reading Elevate Your Home With Stylish Kitchen Window Curtains, originally posted on Decoist. If you enjoyed this post, be sure to follow Decoist on Twitter, Facebook and Pinterest.


from decoist https://ift.tt/rMVvaAQ

Are you tired of tripping over shoes scattered around your home? A DIY shoe rack might be the perfect solution for you. Not only does it ke...

Are you tired of tripping over shoes scattered around your home? A DIY shoe rack might be the perfect solution for you. Not only does it keep your space organized, but it also adds a touch of creativity and personalization to your home. In this comprehensive guide, we will walk you through the process of building your own DIY shoe rack, providing step-by-step instructions, creative design ideas, and helpful tips to ensure your project is a success.

The Benefits of Building Your Own Shoe Rack

Building a DIY shoe rack offers numerous benefits. Not only does it help you declutter and organize your space, but it also allows you to customize the design to fit your specific needs and style preferences. Additionally, creating your own shoe rack can be a cost-effective and rewarding project. By understanding the advantages of a DIY shoe rack, you can feel motivated and inspired to embark on this creative endeavor.

A wooden DIY shoe rack with blue frame and natural wood top that doubles as a bench.
Photo Credit: Popular Science

Planning Your DIY Shoe Rack Project

Before you start building your DIY shoe rack, it’s important to plan and visualize the end result. Consider factors such as the available space, the number of shoes you need to accommodate, and the overall design aesthetic you want to achieve. Sketching out your ideas and taking measurements will help you create a clear plan for your project, ensuring that the end result meets your expectations.

A four shelf DIY shoe rack made of wood.
Photo Credit: Erin Spain

Design Ideas and Inspiration for Your DIY Shoe Rack

When it comes to designing your DIY shoe rack, the possibilities are endless. Whether you prefer a minimalist, modern look or a rustic farmhouse style, there are numerous design ideas and inspirations to explore. Consider incorporating features such as adjustable shelves, built-in seating, or decorative accents to elevate the functionality and visual appeal of your shoe rack. By exploring different design options, you can find the perfect style that complements your home decor.

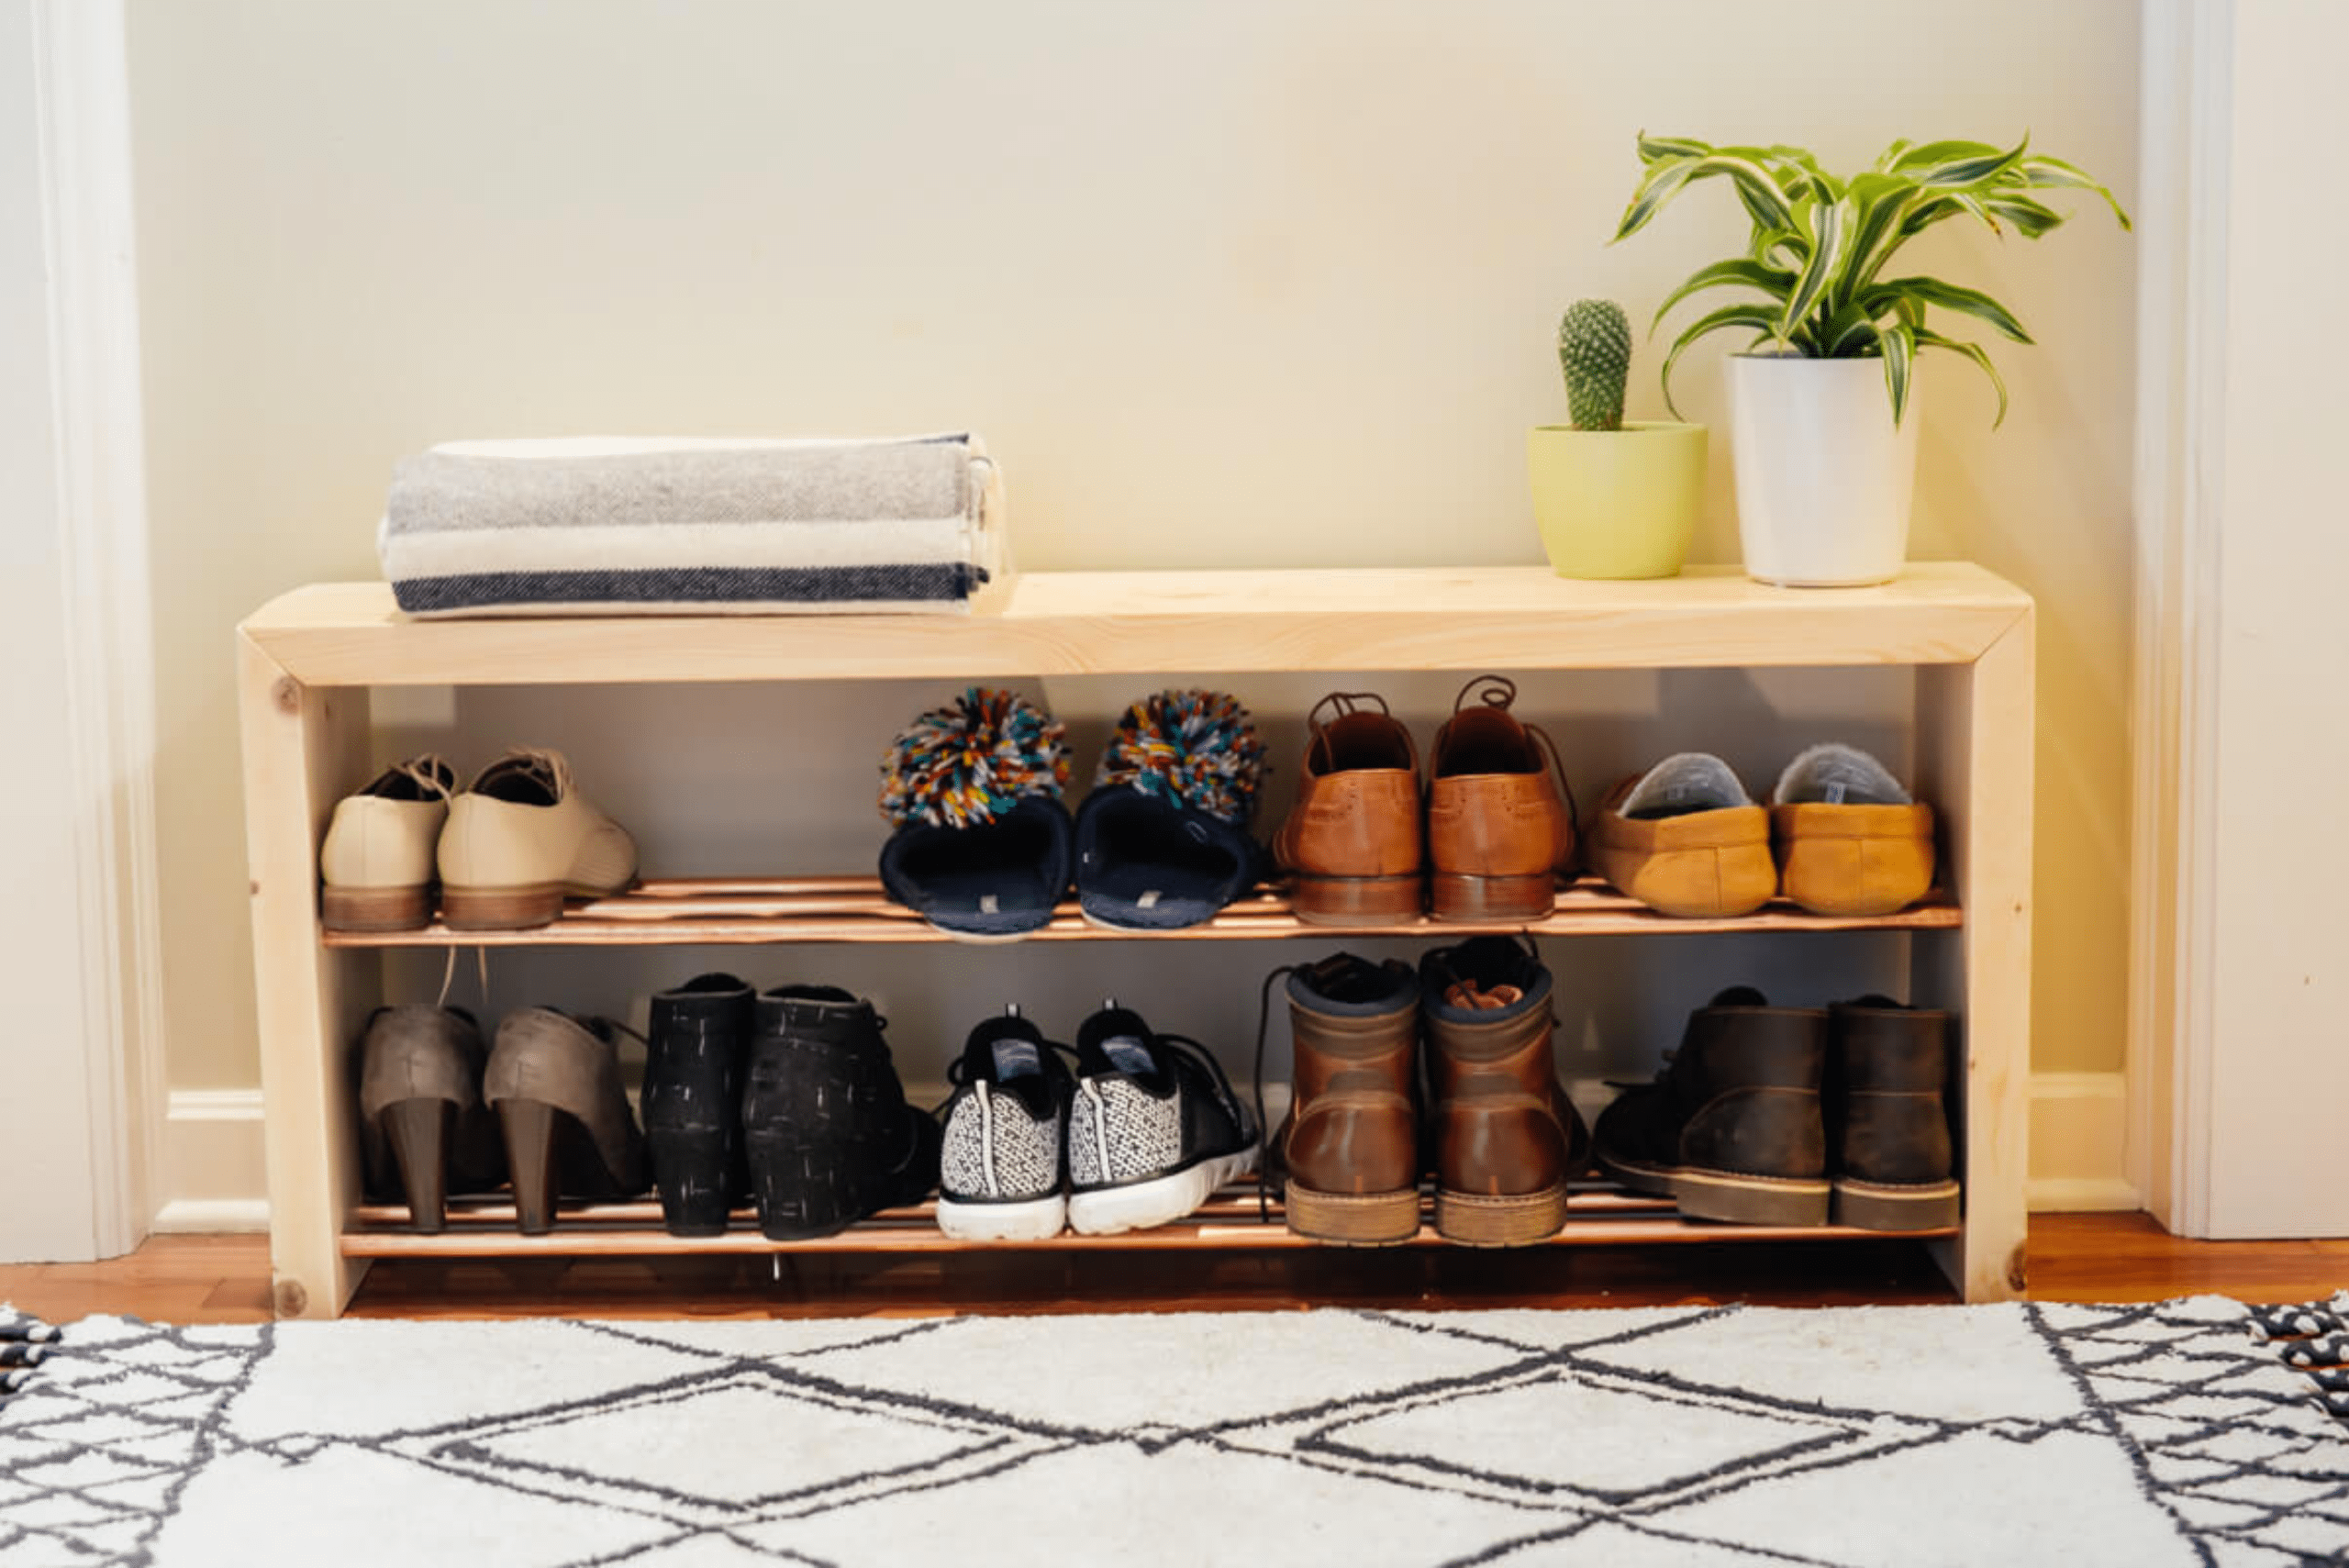
Wooden DIY shoe rack storing a collection of men and women shoes.
Photo Credit: Dunn Lumber

Choosing the Right Materials for Your DIY Shoe Rack

Metal DIY shoe rack with copper joints.
Photo Credit: Crafty Lumberjacks

Selecting the appropriate materials is crucial for the success of your DIY shoe rack project. Depending on your design preferences and skill level, you can choose from a variety of materials such as wood, metal, or even repurposed items. Consider factors such as durability, aesthetics, and ease of construction when making your material choices. Additionally, ensure that the materials you select align with your overall vision for the shoe rack.

A DIY shoe rack made of PCV connectors and plastic pipes.
Photo Credit: Crazy DIY Mom

Step-by-Step Instructions for Building Your DIY Shoe Rack

Now that you have a clear plan and design in mind, it’s time to start building your DIY shoe rack. We will provide you with detailed, step-by-step instructions to guide you through the construction process. From cutting the materials to assembling the pieces, we will cover each stage of the project, ensuring that you can successfully build your own custom shoe rack.

Materials:

  1. 1×12-inch pine boards (quantity depends on the desired size)
  2. 1×2-inch pine boards (you can opt for hardwood, but it’s harder to work with)
  3. Wood screws (2-inch and 1-inch)
  4. Wood glue
  5. Sandpaper (medium and fine grit)
  6. Wood stain or paint
  7. Polyurethane (optional for a glossy finish)

Tools:

  1. Brushes or rags for staining/painting
  2. Screwdriver or drill
  3. Saw (circular or miter saw)
  4. Measuring tape
  5. Pencil
  6. Safety equipment (gloves, safety glasses)

Step-by-Step Build Instructions

Person grabbing a wooden board.
Photo Credit: Canva Pro

Step 1: Design and Measurement

  • Determine the size of your shoe rack. Measure the available space and decide on the height, width, and depth of the rack.
  • Sketch a design with the number of shelves and their spacing. This will serve as your blueprint.

Step 2: Cut the Boards

  • Using a saw, cut the 1×12-inch pine boards to the desired lengths for the shelves. Also, cut the 1×2-inch boards for the frame and supports.
  • Sand all cut edges with medium grit sandpaper to smooth out any rough spots.

Step 3: Assemble the Frame

  • Lay out the 1×2-inch boards to form the vertical sides and horizontal supports of the frame.
  • Apply wood glue to the joints and secure them with 2-inch wood screws.
  • Ensure the frame is square by measuring diagonally from corner to corner. Adjust if needed.

Step 4: Attach the Shelves

  • Apply wood glue to the top edges of the frame.
  • Place the 1×12-inch boards on top, ensuring they are evenly spaced.
  • Secure the shelves by driving 1-inch wood screws through the top of the shelves into the frame.

Step 5: Reinforce the Structure

  • To add stability, cut additional 1×2-inch boards to the length of the shelves.
  • Attach these supports underneath the shelves using wood glue and screws.

Step 6: Sanding

  • Smooth all surfaces with fine-grit sandpaper. Pay special attention to corners and edges.
  • Round the edges slightly for a finished look.

Step 7: Stain or Paint

  • Apply your chosen wood stain or paint using brushes or rags.
  • Allow it to dry completely before applying a second coat, if necessary.

Step 8: Finish with Polyurethane (Optional)

  • For added protection and a glossy finish, apply a coat of polyurethane.
  • Let it dry according to the manufacturer’s instructions.

Step 9: Mount or Place

  • Decide whether you want to mount the shoe rack on the wall or place it on the floor.
  • If mounting, use appropriate wall anchors and screws.

Tips and Things to Look Out For:

  • Wear safety gear, especially when using power tools.
  • Double-check measurements before cutting to avoid errors.
  • Sand thoroughly to achieve a professional finish.
  • Follow the recommended drying times for glue, paint, and polyurethane.
  • Consider the weight capacity if planning to store heavy items on the shelves.
  • Secure the shoe rack firmly if mounting to the wall to prevent accidents.

Tips for Finishing and Customizing Your DIY Shoe Rack

Once the construction phase is complete, it’s time to add the finishing touches to your DIY shoe rack. Whether you choose to stain, paint, or seal the wood, the finishing process allows you to customize the appearance of your shoe rack to match your personal style. We will provide you with tips and techniques for achieving a professional finish, as well as creative ideas for adding decorative elements to your shoe rack.

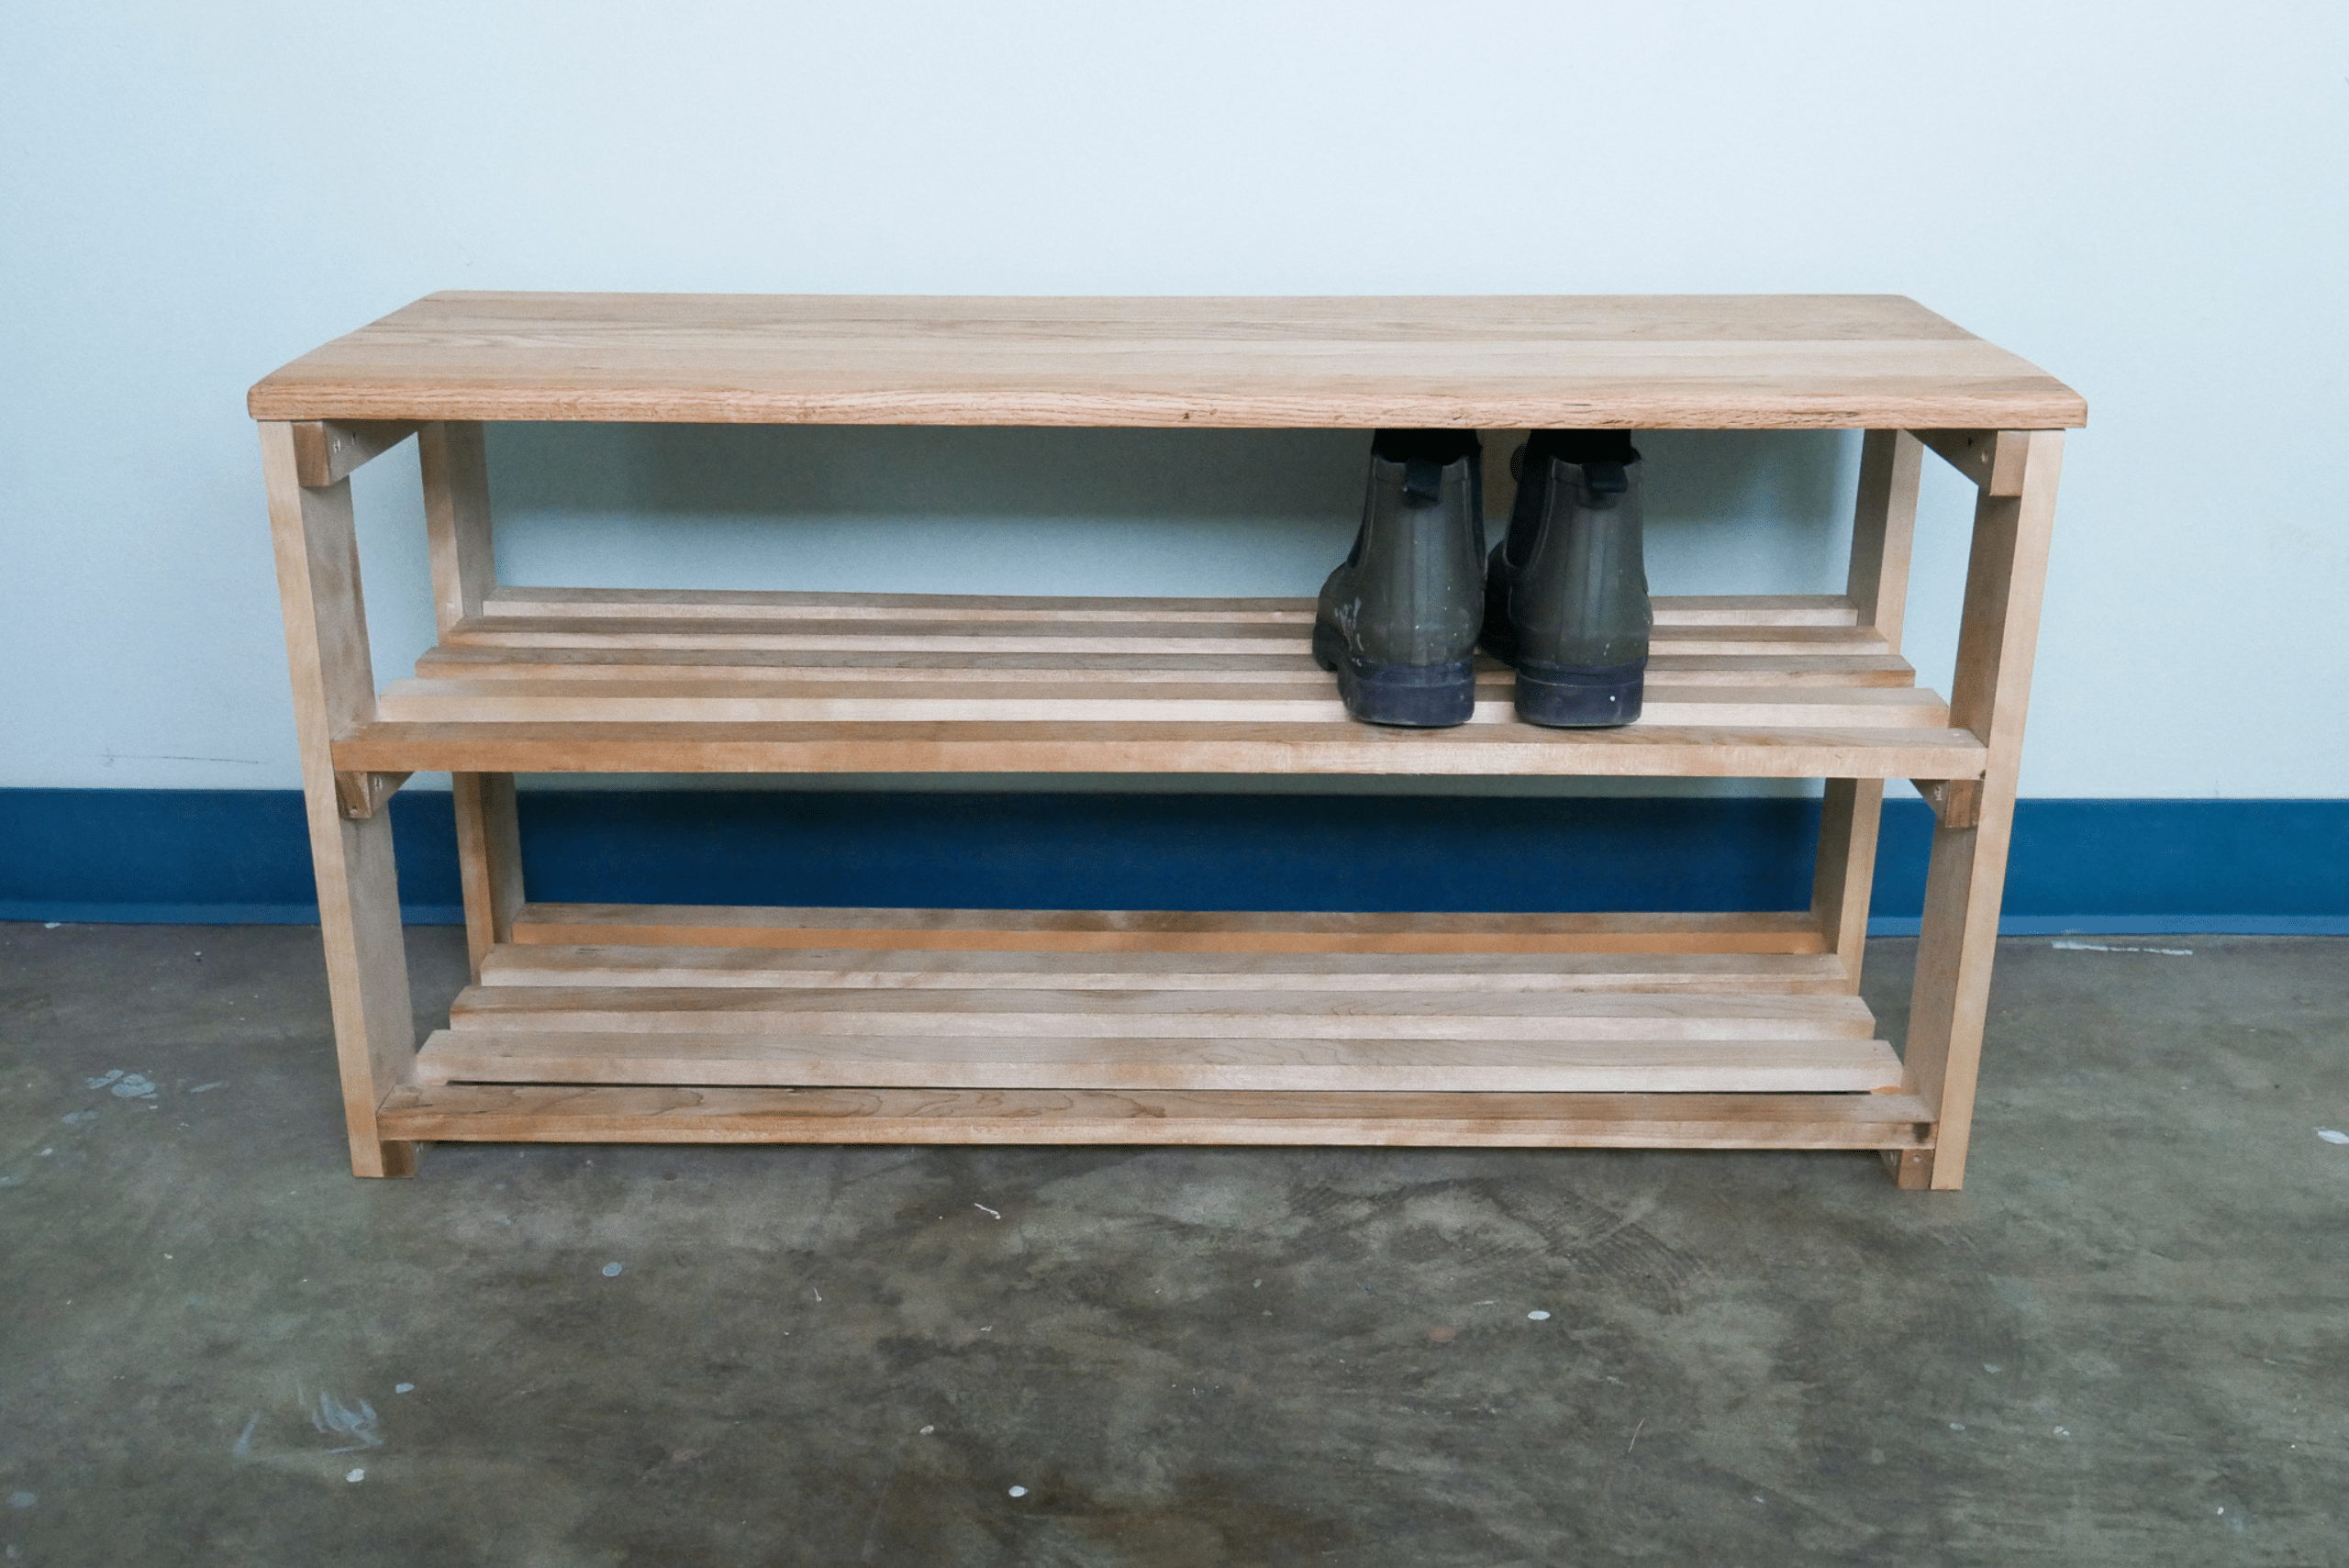
Unfinished DIY wooden shoe rack with one pair of shoes on the second shelf.
Photo Credit: The Green Project

Organizing Your Shoes on the DIY Shoe Rack

With your newly constructed shoe rack in place, it’s time to organize your shoe collection. There are various practical ways to arrange and store your shoes on the rack, maximizing space and accessibility. Whether you prefer to sort your shoes by style, color, or frequency of use, you will have pleasant and efficient access to your shoes.

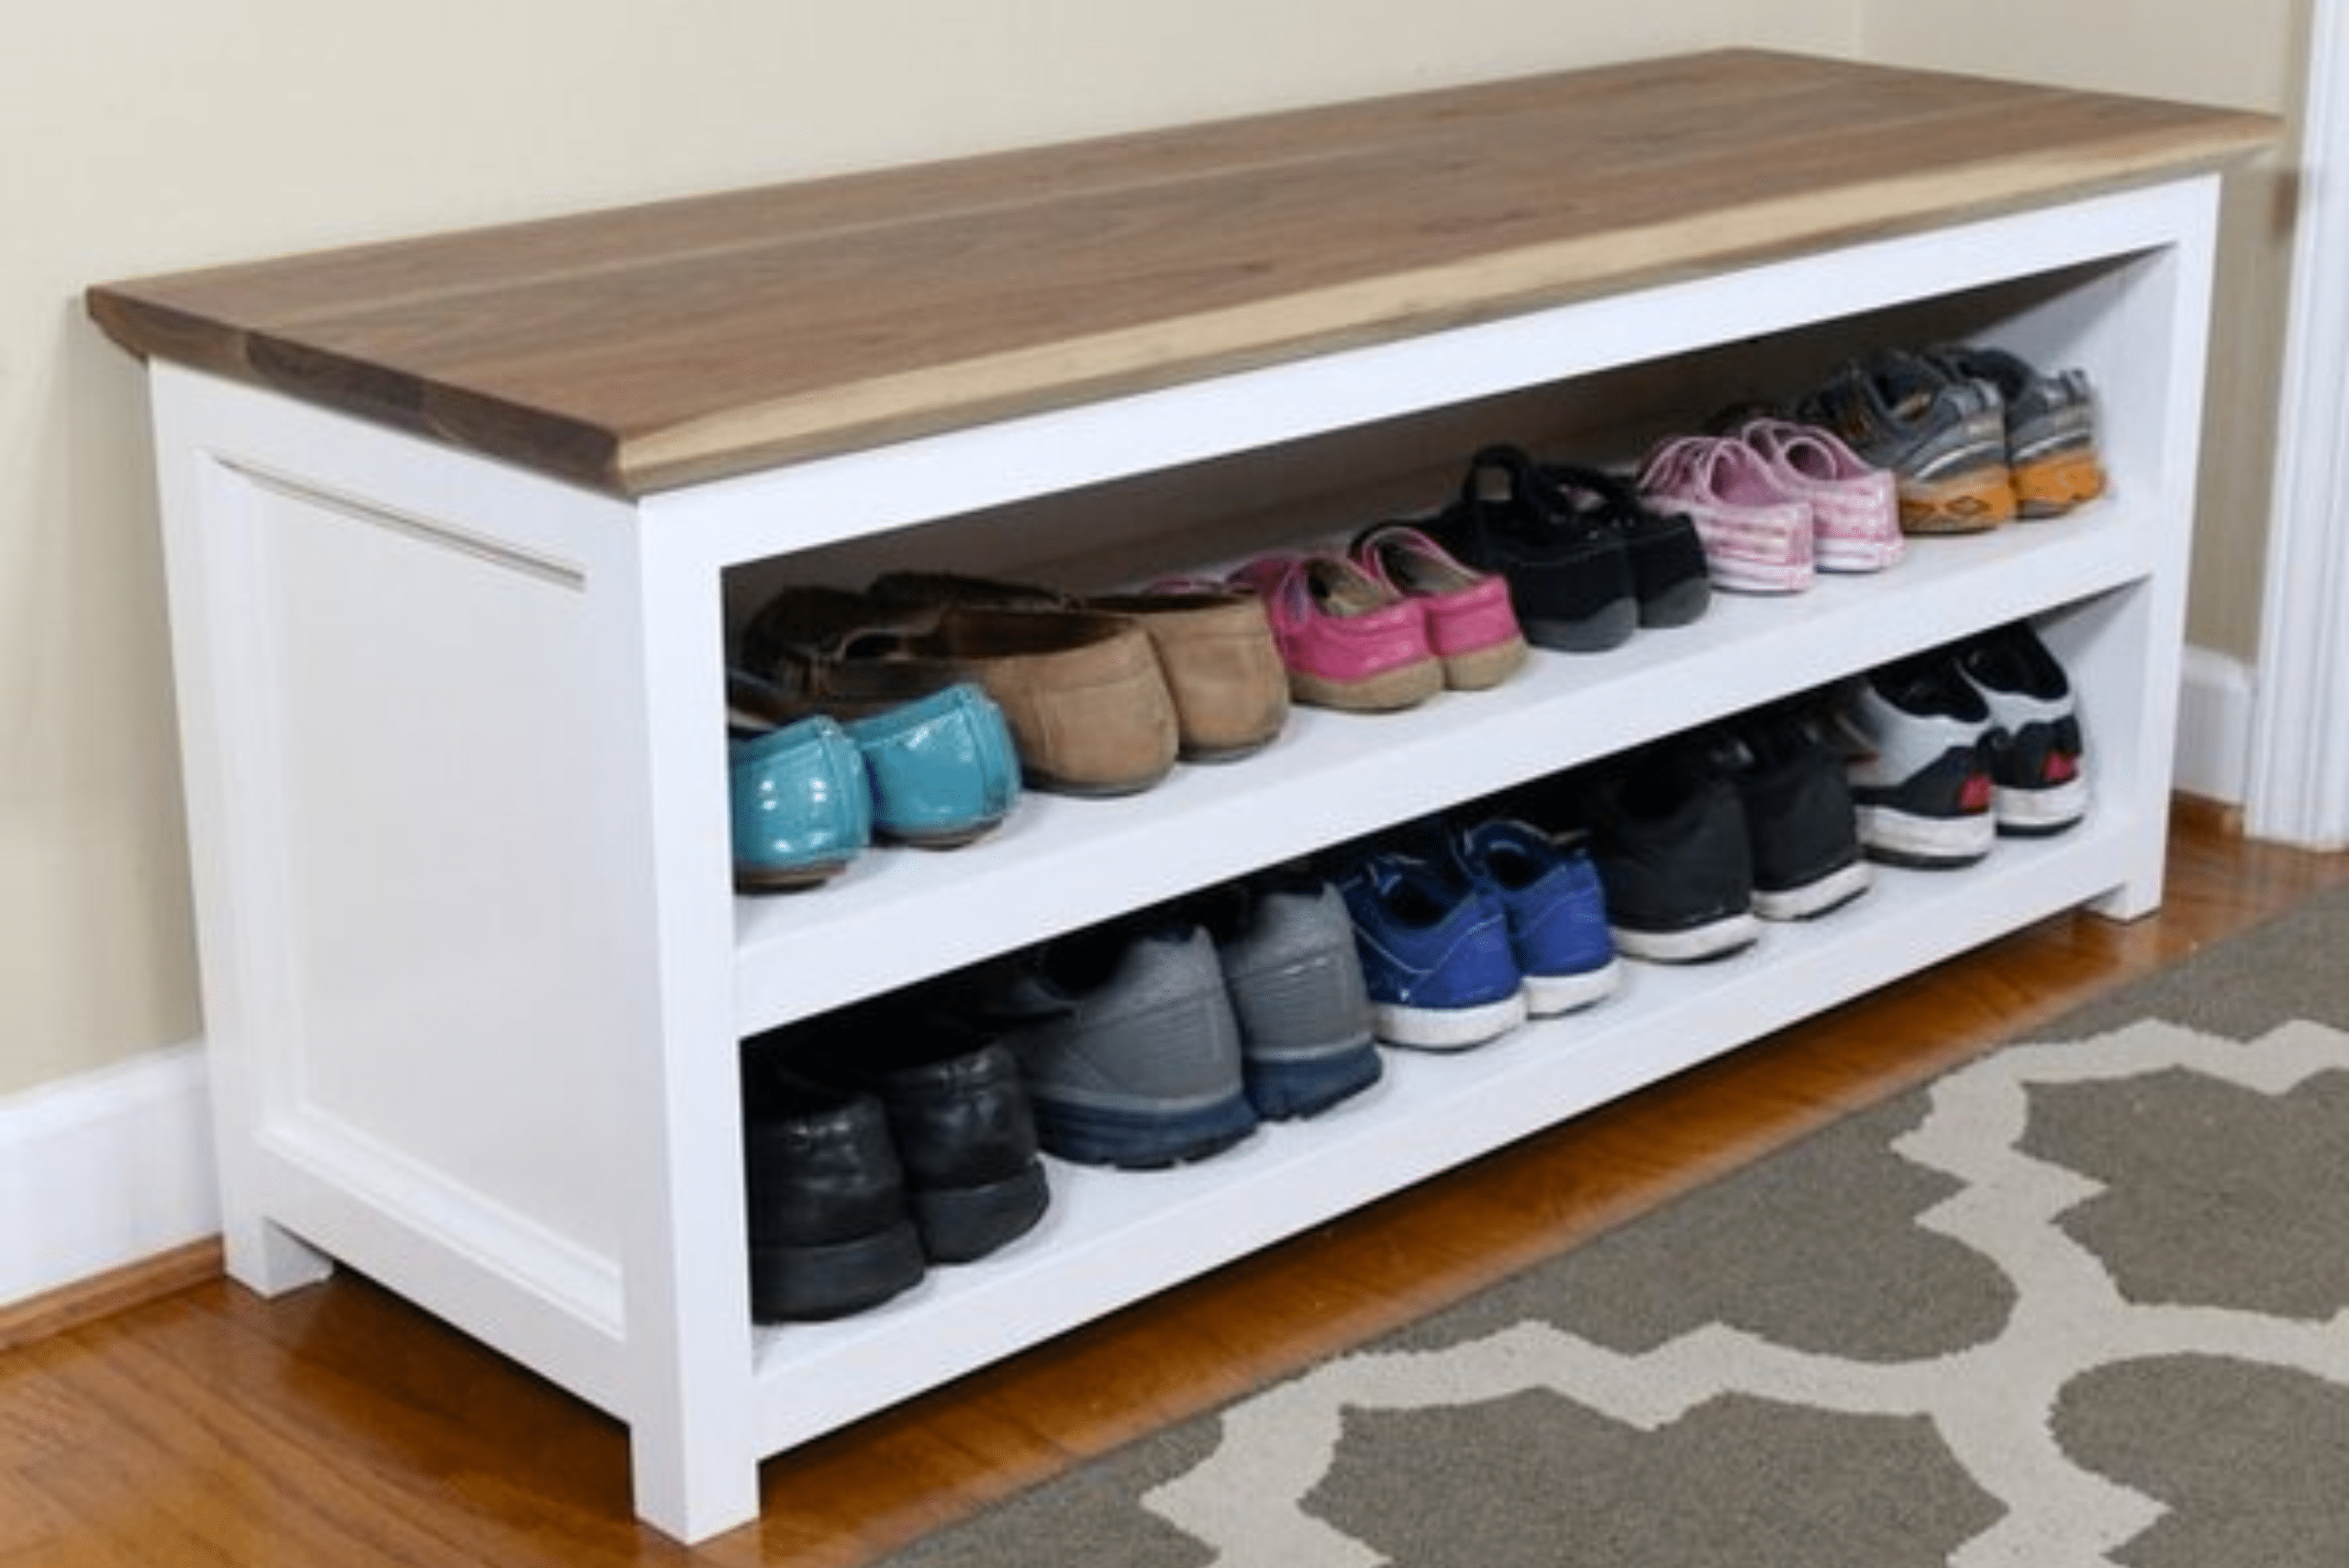
Wooden DIY shoe rack with white frame and natural wood top.
Photo Credit: Fix This Build

Building your own DIY shoe rack is a rewarding and practical endeavor that allows you to transform your living space while expressing your creativity. Enjoy creating a functional and visually appealing storage solution for your shoes, and embrace the satisfaction of completing a successful DIY project.

Ready to bring new life to your home? Subscribe to our newsletter for exclusive interior design tips, trends, and ideas that will transform your space. Click here to subscribe!

You're reading Craft Your Own DIY Shoe Rack: Your Complete Guide, originally posted on Decoist. If you enjoyed this post, be sure to follow Decoist on Twitter, Facebook and Pinterest.


from decoist https://ift.tt/EGlBgFo